Once your vault is open, Myne is a single window with a few fixed regions. This tour names each one so the rest of the guide can refer to them without re-explaining. The names below describe the layout in a left-to-right language. If your interface language is written right to left — Arabic, Urdu or Persian — the whole layout mirrors, so the note sidebar sits on the right and the multi-tab panel on the left. What each region does is unchanged.
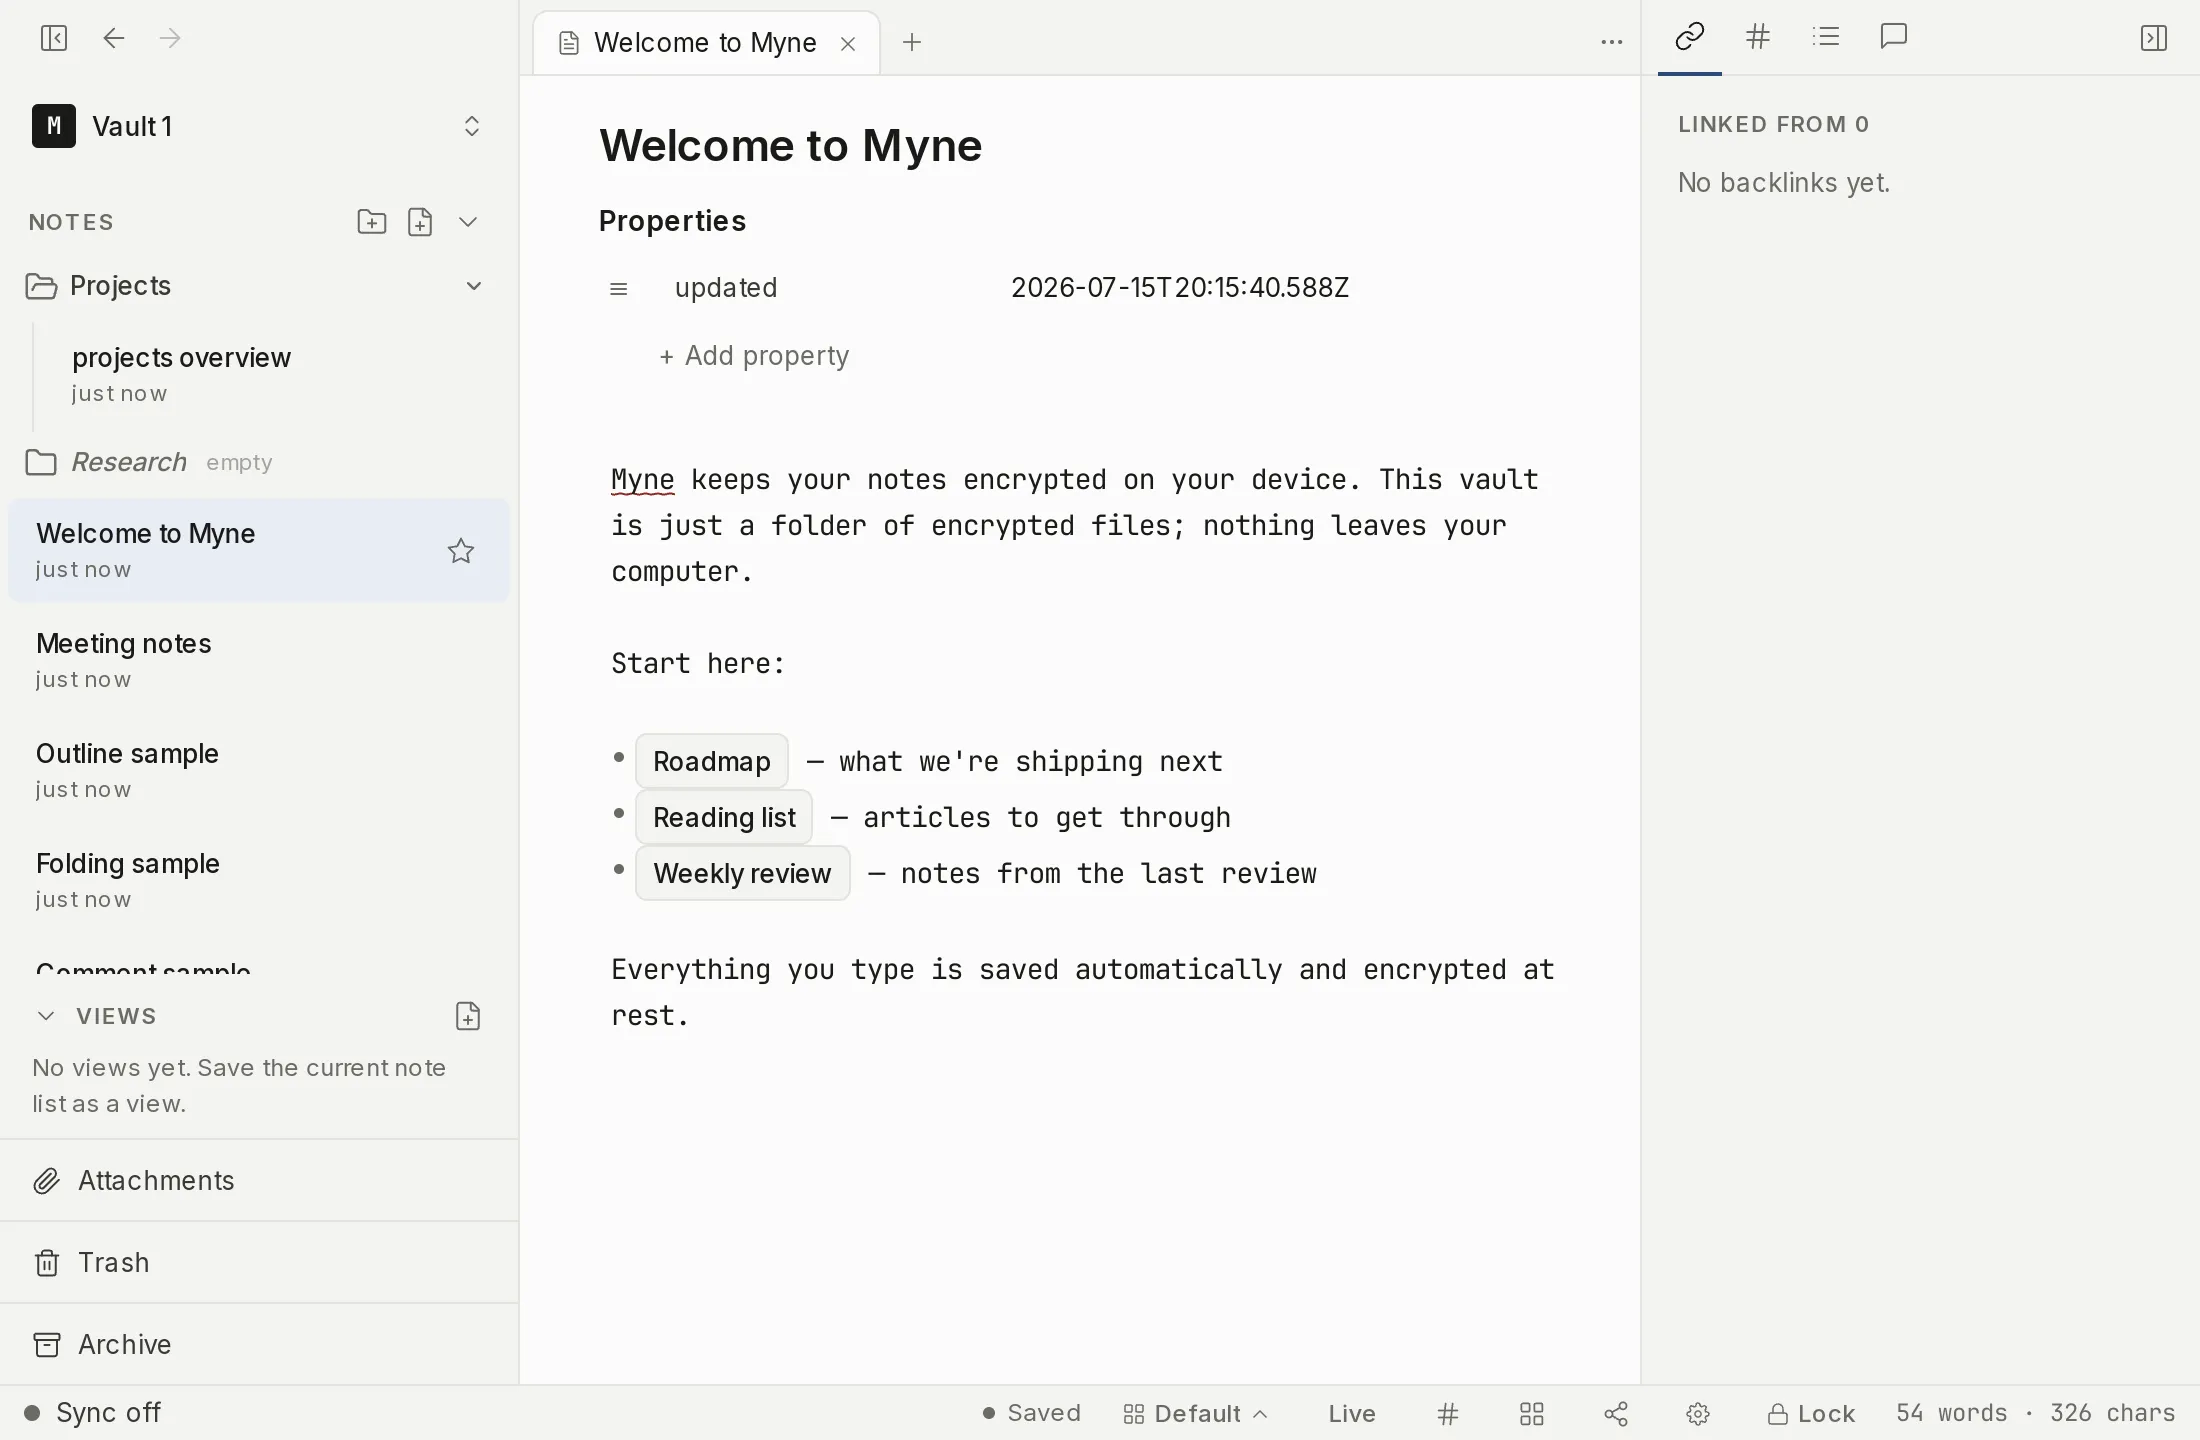
The left sidebar
The left sidebar runs top to bottom:
- The vault-switcher chip at the top shows which vault is open. If you keep more than one vault, this is where you switch between them; see Multiple vaults.
- Favorites, above the tree, once you have added notes to it.
- The note tree, with a + button in its header. That one button is where new things come from: New note, New note from template…, New drawing, and New folder. Select a note to open it; right-click a note or folder for the rest of the organizing actions.
- Views, when saved views are turned on (Settings → Editor). Selecting it opens a searchable flyout listing your saved views.
- A footer carrying Attachments, and a single line split between Trash and Archive, each showing a count when it is not empty.
The tab strip and editor
The center is where you read and write. Notes open in tabs along the top, and you can split the pane to put two notes side by side. The editor itself fills the rest of the space: plain markdown, with autosave handling persistence (see Your first note).
In the top-left chrome, next to the sidebar toggle, two arrow buttons walk through the notes you have visited: navigate back (⌘[ / Ctrl [) and navigate forward (⌘] / Ctrl ]). Each greys out when there is nowhere to go.
In the top-right, while a note is open, a … button opens the note-actions menu: Rename, Add cover, Move to folder…, Duplicate, Version history, Turn into template, Export… (which opens the formats beside it: Markdown, PDF, HTML, Plain text) and Move to trash.
The note’s right-click menu in the sidebar overlaps with that list without matching it. It carries the organizing actions instead: Open in new tab, Open to the side, Move to…, Add to favorites, Set as folder note, Color…, Archive and Delete, alongside Rename, Duplicate and the same four exports. It does not offer Add cover, Version history or Turn into template. Use the … menu for what a note is, and the right-click menu for where a note sits.
Opening a new tab shows a chooser card rather than a blank editor — search your notes to open one, pick from Recent, or create a new note or drawing from there.
The right sidebar
The right sidebar is a multi-tab panel. A strip of tabs at the top switches what it shows about the note you are reading:
- Links: both directions at once — Linked from, the notes that link to this one, and Links to, the notes this one links out to.
- Unlinked mentions: notes that name this one without linking to it.
- Outline: the note’s headings, as a jump list.
- Tasks: the open note’s own checklist items, in one place. The vault-wide Tasks view is separate; this tab is about the note you are reading.
- AI Chat: a chat panel over your notes. It appears only once you have turned AI on, and AI is off by default — with it off, the tab is not in the strip at all. On a computer, turning it on is itself behind Developer mode; on a phone there is no such group and AI is a top-level Settings category. See Turning on AI.
The tabs behave like the items in the bottom bar: right-click the strip to hide or show individual tabs, and drag a tab to reorder it. Your choices persist with the vault.
How links and unlinked mentions work, and the rest of Myne’s linking and search tools, are covered in Find & connect.
The bottom bar
The status bar along the bottom carries small, persistent controls and readouts. The left half is empty; everything sits in one cluster on the right, in this order:
- Side-by-side preview: in source mode only, toggles a rendered preview beside the markdown. It is pinned at the start of the cluster and is the one item you cannot hide or reorder.
- Save status: a dashed ring while your typing is still waiting to be written, a turning ring while it is being written, and a filled dot with the time once it is saved. Once sync is on, a note whose latest edits have not reached the server carries a crossed-out cloud after it, labelled Not yet on the server.
- Workspace chip: shows the active named workspace and lets you switch between, rename, or save the current layout as a named workspace.
- View mode: shows the focused note’s mode (Live, Reading, or Source) and cycles through them on click; see View modes.
- Tags: opens the tag browser for the vault.
- Views: opens the saved views surface.
- Graph: opens the graph view of your notes and their links (also
⌘⇧G). - Settings: the gear opens settings (also
⌘,). Its panels cover your account, privacy, sync, the editor, files, transcription, hotkeys, appearance, storage, and an about page. See Settings & privacy. - Lock: locks the vault immediately and returns to the Unlock screen. The command palette lists the same action as Lock vault.
- Vim mode: when Vim keyboard mode is on, shows the current mode (Normal, Insert, Visual, or Replace).
- Word count: the document-statistics readout for the current note (words and characters, with the full breakdown on hover); it follows your selection when you have one.
There is no sync readout in this bar, and an item with nothing to report does not draw at all: the Vim indicator is absent until you turn Vim keyboard mode on, and the view-mode cycler needs an open note.
Right-click anywhere on the bottom bar to hide or show individual items, right-click a single item to move it left or right, and drag an item to reorder it. Your choices persist with the vault. Messages Myne needs to tell you about appear as a stack of notifications above the bar and dismiss themselves.
Panels that are hidden until you ask for them
Some controls are not missing, just kept out of the way. Turning on Developer mode in Settings → About adds a Developer group at the bottom of the settings list — AI and Network (Tor routing) — and reveals two settings that stay in their own panels: CLI terminal access under Privacy, and Vim keyboard mode under Editor. Turning it back off hides those controls again without switching off anything already running. If you are looking for a panel this tour does not name, that is where it is; see Developer mode.
The command palette
Press ⌘K (or its alias ⌘P) to open the command palette, a searchable list of actions like locking the vault, opening settings, showing the graph, importing notes, and managing templates. It is the fastest way to reach anything that isn’t a click away.
Shortcuts
These are defaults you can change: Settings → Hotkeys lists every rebindable command and lets you record your own chord (see Custom hotkeys). Editor-formatting chords are rebindable too, and a rebind takes effect in the open editor without reloading it. One row is fixed and cannot be rebound: Ctrl Tab for cycling tabs.
| Action | macOS | Windows / Linux |
|---|---|---|
| Open command palette | ⌘K (alias ⌘P) | Ctrl K (alias Ctrl P) |
| New note | ⌘T (also ⌘N) | Ctrl T (also Ctrl N) |
| Find in note | ⌘F | Ctrl F |
| Close tab | ⌘W | Ctrl W |
| Navigate back | ⌘[ | Ctrl [ |
| Navigate forward | ⌘] | Ctrl ] |
| Open settings | ⌘, | Ctrl , |
| Show graph view | ⌘⇧G | Ctrl Shift G |
| Show tasks | ⌘⇧T | Ctrl Shift T |
| Toggle reading view | ⌘⇧E | Ctrl Shift E |
| Toggle focus mode | ⌘⇧F | Ctrl Shift F |
| Next / previous tab (fixed) | Ctrl Tab / Ctrl Shift Tab | Ctrl Tab / Ctrl Shift Tab |
| Split pane right | ⌘\ | Ctrl \ |
| Split pane down | ⌘⇧ + backslash | Ctrl Shift + backslash |
| Focus next pane | ⌘⌥→ or ⌘⌥↓ | Ctrl Alt → or Ctrl Alt ↓ |
| Focus previous pane | ⌘⌥← or ⌘⌥↑ | Ctrl Alt ← or Ctrl Alt ↑ |